Categories
About UsHow to get startedAccount AccessTrading DOM
Ready to start trading on WealthCharts? 📈
To find the WealthCharts Trading DOM, you will want to go to the Main Menu on the top left corner of your platform and then search for "DOM" or find it in the Trading section called "Trading DOM". After you load the DOM onto your platform, you will see the order panel appear at the bottom, and the DOM ladder appear at the top.
At first glance, you will see a spinning circle at the top of your DOM. The DOM is waiting for you to enter the ticker to begin. Click on the magnifying glass icon at the top of the DOM to search for a symbol.
Please see the image and information below for a quick reference on what the DOM has!
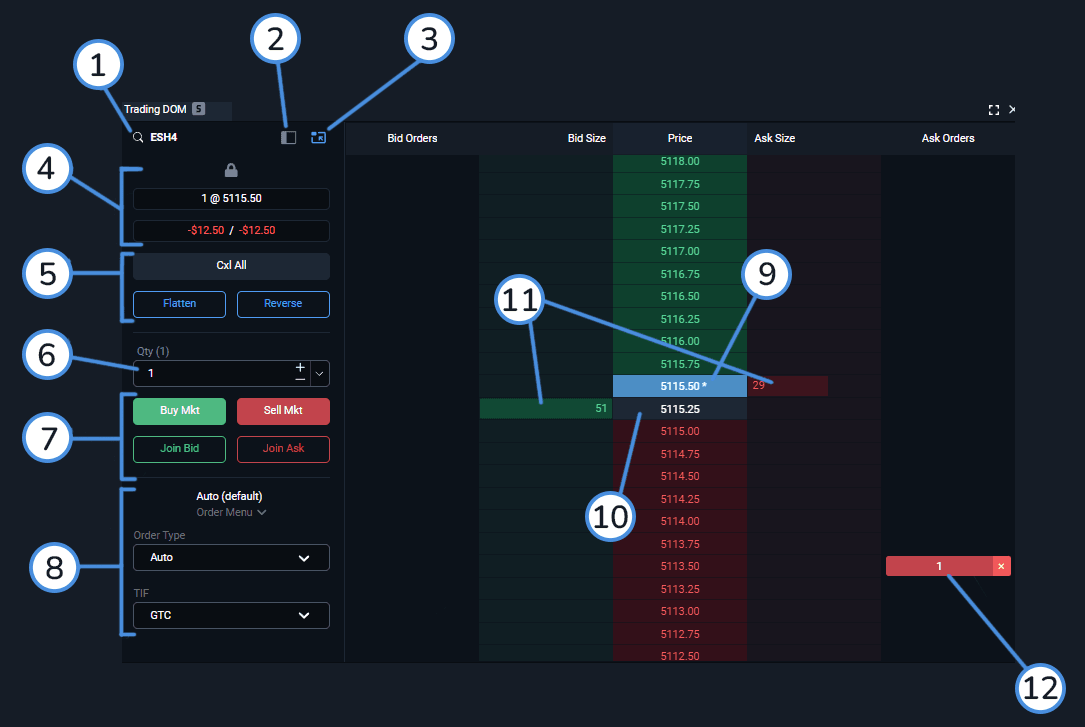
1. The magnifying glass icon allows you to search and change the symbol on your Trading DOM.
1.5. The gear icon allows you to place Ticks, Points, and PnL columns on to your DOM Ladder. These columns are turned off by default and must be turned on first.
2. The Panel Position allows you to move the order panel to be on the left, top, right, or bottom of your DOM ladder.
3. The Open New Window icon allows you to pop the Trading DOM out of your web browser allowing you to move the Trading DOM wherever on your computer.
4. This section covers 3 different items. The lock icon allows you to unlock, lock, or Auto Center the price within the DOM ladder. When you have Auto Center on, when the prices crosses the last row at the top or bottom, the DOM will shift down to center the price again. Unlocking allows you to scroll up and down on the ladder placing specific orders in the Bid Size & Ask Size columns.
The next field tells you your current position with the first number being how many contracts or shares you have purchased and at what price. The next field will potentially show two different values. The first value is the profit or loss of your current position. The second value on the right side is your total profit or loss for the day in that specific market.
5. This section covers 3 different items as well. The Cxl All button is the cancel all button which cancels all orders that you have out for that specific ticker. The Flatten button allows you to exit the position you are in including any stops and orders you have for that specific ticker. Finally the Reverse button changes the direction of your position. For example, instead of being in a "short position" it will change to a "long position".
6. The Qty field is the quantity section. This allows you to manually change the amount of contracts or shares when placing an order or getting into a position. You can manually type in the amount of shares or use the plus, minus, and drop-down buttons to change the amount too.
7. This section covers 4 different buttons which allow you to buy and sell the markets. The Buy Mkt and Sell Mkt buttons allow you to buy or sell the selected market at the current price. The broker fills your order at the best possible price. The Join Bid and Join Ask buttons allow you to jump above all other bids and below all other asks. The broker then fills your order at the closest available Bid price or closest available Ask price.
8. This section covers the Order Menu. This order menu is not available unless you are connected to a Apex, Tradier, or Rithmic data source. In the Order Type drop-down menu, you can place different orders such as, Auto, Simple Bracket, Trailing Stop, Breakeven Stop, Stop Loss, or Take Profit. When selecting a different order type, you may see more fields appear asking you for the tick amount for your profit, stops, and so on.
The TIF section stands for "Time in Force" and the dropdown gives you two different options. GTC stands for Good 'Til Cancel, which means you will always be in your position until you cancel it or if your broker cancels it due to account reasons. The Day option means your position will be closed at the end of trading day for that specific market.
Order Type - Select the drop-down box and choose your Order Type. You can select from Auto, Simple Bracket, Trailing Stop, Breakeven Stop, Stop Loss, and, Take Profit. Below is more information on what each order type does.
Auto - The order type is determined automatically by our system, based on what you click in the order panel/price ladder
Simple Bracket - This allows you to place a trade along with two pending orders, one below the entry price, and one above. The distance of the pending orders from your entry price is determined manually before the trade is placed.
Trailing Stop - This allows you to create a trade that will have a stop loss order attached to it - this stop order will update itself and move in the direction of your trade at a certain distance as the trade progresses.
Breakeven Stop - This allows you to place a stop that will be adjusted to a predefined distance (offset) automatically once a certain profit floor (breakeven trigger) has been reached.
Stop Loss - This allows you to attach a pending stop order to your trade that will be executed if the prices move against you by a predefined margin
Take Profit - This allows you to attach a pending limit order to your trade that will be executed if the prices move in favor of your trade by a predefined margin
9. This is your current position visualized on the DOM Ladder. It will always be a blue color.
10. This is the current price visually shown on the DOM Ladder. By default, it will always stay in the center of the ladder unless you unlocked the auto-center feature as mentioned in #4.
11. These two areas are the different orders being filled in the Bid Size and Ask Size columns. Depending on your broker and the level of data you have, you may see more or less of these.
12. These are pending limit orders or stops you have placed. They can be visually shown on the DOM ladder or on the chart. You can drag these to different areas in the column to change your order. If you left click on the order you placed in the Ask Orders or Bid Orders columns, a small box will appear at the center of your screen allowing you to manually adjust the size of your order and the price it's located at.
Watch this video for further assistance on the Trading DOM: