Categories
About UsHow to get startedAccount AccessBrokers and TradingChartsScanner Alerts
Did you know you can access Scanner Alerts from virtually any scanner on WealthCharts? The easiest way to tell is if there is a blue "🔔Create Alert" button located at the top of your feature! When you select that button, a menu will appear in the middle of your screen giving you multiple different conditions to set for your alert.
If you are looking for the home of Scanner Alerts, be sure to go to the top left corner of your platform and select the Main Menu button. After that, go to Market Tools and you will see the Scanner Alerts component there to load!
Creating An Alert
To create an alert, click the “Create New Alert” button, and pick a scanner that you would like to use as the source of conditions that will trigger your alert.

First, you will need to select a symbol and a timeframe for your alert. This can be done using the symbol and timeframe search menus. Note that multiple symbols and timeframes can be selected to avoid configuring the same alert multiple times. Any symbols or timeframes can also be deselected using the “X” button next to their labels underneath these menus.

Alert Conditions
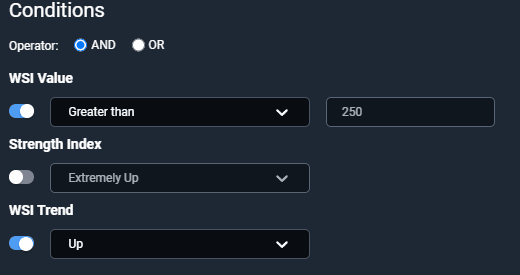
The most important part is setting up the conditions for your alert. Here, the user can specify what exactly is supposed to trigger the alert – a certain metric being above/below a predefined threshold, for example, a WSI rating rising above 250; Or possibly, a certain signal being fired by the indicator, such as a new bullish or bearish dot showing up on the chart. Multiple conditions can be configured and united by AND or OR logical gates – you can use the radio buttons at the top of the conditions list to do that. When AND is selected, ALL of the conditions will be required to trigger the alert, however with OR enabled, even one of the conditions being met will suffice to fire the alert off.
Of course, depending on which scanner is being used, different conditions and their combinations will be available here.
Alert Types
Alerts can be delivered by three different delivery methods – an in-app notification (a small notification box that shows up in the top right corner of your platform), accompanied by a ringing sound, an email, and an SMS message. You can change the phone number that is assigned to your profile under the Preferences menu of the platform!

Once all of the above has been completed, the alert can be finalized using the “Create Alert” button.
Viewing Triggered And Active Alerts
The main part of the Scanner Alerts window offers a detailed summary of each alert that has been set up in the past, with details about what conditions are present within the alert, when it was set up, and it’s current status. Triggered alerts will also have a triggered date/time, and a green highlight next to the alert row. On the right is a delete button to cancel/delete your alert, and a reset button that allows to quickly restart alerts that have already been triggered.

The list can also be narrowed down by alert status, symbol lists and scanners of origin.

Pro Tip: Did you know that you can reset Scanner Alerts that have already triggered? Within the Scanner Alerts component, refer to the far right column and find an arrow forming a circle. This will reactivate a new Scanner Alert with the same exact conditions and symbols etc.
To see the Scanner Alerts in action, please review the video below: